The official discord link if you wish to join the discord: https://discord.gg/j5RKwCvAFu
Support the wiki on our official Ko-Fi page or Patreon page!
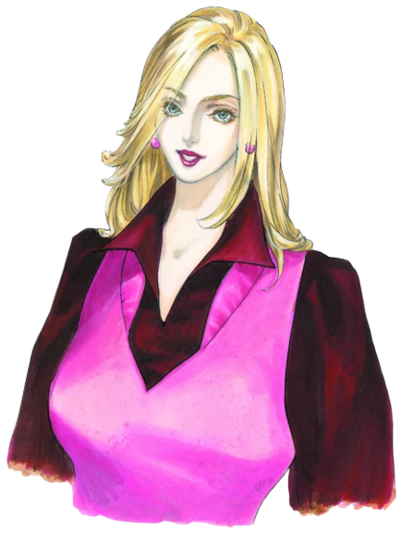
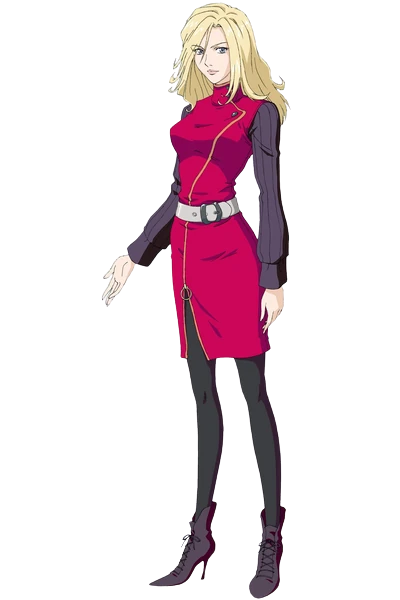
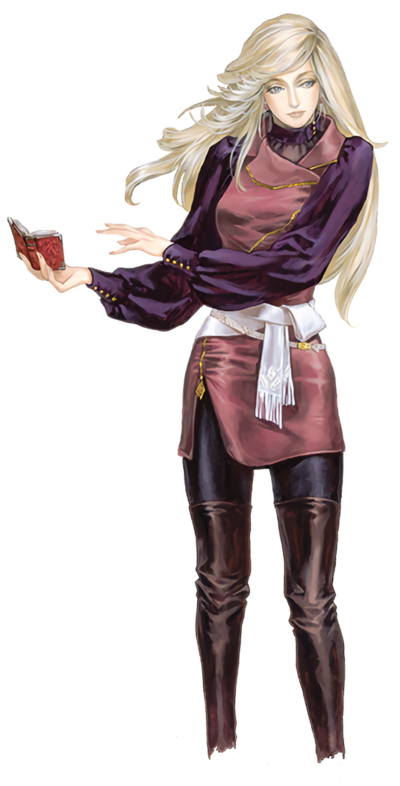
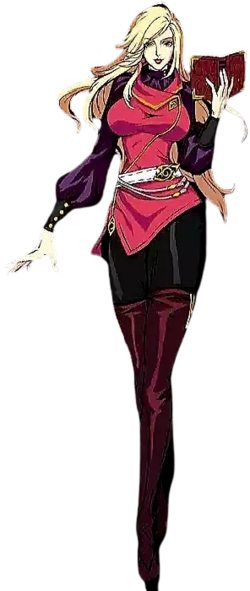
Yoko Belnades
From The Codex

|
"Mature Content" |
| This character or verse has mature themes and concepts, thus those of young age are ill-advised to look through these. |
| “ | You are yourself. There's no one else you could be. Don't second guess yourself. Be confident. That's most important. | „ |
| ~ Yoko to Soma Cruz about his dark powers |
| “ | Good morning, Soma. I just heard about what happened to you... I told you this before... You are who you are, and you mustn't let him win. | „ |
| ~ Yoko to Soma Cruz right before he goes to fight Chaos |
| “ | I'm sorry, Soma. I will free you from your torment. | „ |
| ~ Yoko to Soma Cruz if he turns into Dark Lord Soma |
Background
Yoko Belnades is a descendant of the Belnades Clan and a powerful witch, much like her ancestor, Sypha Belnades. She shares a close bond with Mina Hakuba, the daughter of the owner of the Hakuba Shrine, and acts as an older sister figure to her. Yoko works for the Church, assisting in their efforts to locate Count Dracula and the remnants of his power.
| This dropdown contains the synopsis of Yoko Belnades’ story. Read at your own risk as you may be spoiled otherwise! |
|---|
|
Castlevania: Aria of Sorrow Castlevania: Dawn of Sorrow |
General Information
Name: Yoko Belnades[1]
Origin: Castlevania: Aria of Sorrow
First Appearance: Castlevania: Aria of Sorrow
Latest Appearance: Vampire Survivors
Company: Konami
Creator: Koji Igarashi
Actor
- Japanese Voice Actor: Ao Takahashi
- English Voice Actor: Karen Strassman
Sex: Female
Sexuality: Heterosexual
Pronouns: She/Her
Age: 24 in Aria of Sorrow (Listed as 24 years old in the manual[2]), 25 in Dawn of Sorrow (A year has passed since the events of Aria of Sorrow[3], listed as 25 in the Dawn of Sorrow manual[4]), 26 in Requiem of the Divine Abyss (The events of the novel take place a year after Dawn of Sorrow)
Birth Year: 2011 (As she is 24 in Aria of Sorrow[5], which takes place in 2035[6])
Homeworld: Earth
Residence: Church
Story Role: Supporting Protagonist
Classification: Witch, Member of the Church[7], Member of the Belnades Clan
Species: Human
State of Being: Regular
Physiology: Humanoid Physiology
Occupation: Vampire Hunter
Affiliations: Belnades Clan, Belmont Clan, Genya Arikado, Julius Belmont, Soma Cruz, Curtis Lang, Michelle Danasty
Enemies: Dark Lord Soma (In the Dark Lord Ending), Graham Jones, Celia Fortner, Dmitrii Blinov, Dario Bossi, Orlox, Puppet Master, Legion
Height: Unknown
Weight: Unknown
- During her Time: Alive
- Modern Time: Deceased (As she existed back in 2000s, she is naturally dead from old age)
Date of Death: Unknown
Alignment: Lawful Good (A member of the Church[9] out to stop evil creatures of the night. Aids Julius Belmont and Genya Arikado in preventing the re-emergence of Dracula)
Protection Level: Global Protector (Aids Julius Belmont and Genya Arikado in preventing the re-emergence of Dracula, where in Castlevania III: Dracula's Curse, Dracula plans to take over all of Europe[10], proceeded to amass an army to kill hundreds of soldiers to take over Europe, plagued the beautiful land located in the Southern Part of Romania into darkness by having devils attack it, planned to spread his evil grip to the rest of Europe[11])
Codex Statistics
Grade: S
Tier: At least 7-C, Far Higher with Sheer Will
Cardinality: Finite
Dimensionality: 3-D
Attack Potency: At least Town level (Potency) (With the aid of Julius Belmont and 2000s Alucard fought and defeated Dark Lord Soma Cruz[12] who serves as the absolute evil, the opposite to God[13], where for God to be perfectly good, there must be a being of perfect darkness[14], being the entity opposite to God[15], making him superior to Golem from Castlevania Judgement, as he died to a random unknown hunter after his return from the time rift[16]. Golem with his ultimate can shoot out a mouth blast that vaporizes everything it touches as far as the eye can see getting these results[17]. Can harm and fight against enemies stronger than characters who can take hits from neutron bomb[18], that have a yield range of 1-10 kilotons of TNT), Far Higher with Sheer Will (Simon claims that the Belmonts and Morrises did not defeat Dracula because of the Vampire Killer, with the reason behind heroes' capacity to fight against evil lying not in their physical strength but the noble desire to drive away evil and usher in all that is good, the desire to protect the world for all of humanity, with the courage to fight to protect others being the true essence of a hero and a Belmont's strength, with this even applying for other heroes such as Shanoa, Maria, Charlotte, and even Arikado[19]. Alucard notes that having something to protect surpasses the limits of strength[20])
Durability: At least Town level, Far Higher with Sheer Will
Striking Strength: At least Town Class (Potency), Far Higher with Sheer Will
Lifting Strength: At least Class 10 (Should be superior to Hector's Battle-Type innocent devils who can move entire tree logs that are blocking roads out of the way[21] where logs can weigh around 15 to 5 tons[22] and Hector's battle-type innocent devils can lift open large iron doors that "no man could force open"[23]), Far Higher with Sheer Will
Travel Speed: Superhuman regularly (Comparable to Leon Belmont, who was able to escape Walter's Castle while running from the top floor to the entrance, before the entire structure collapsed[24]). At most Faster Than Light through full Aura (Comparable to Juste Belmont where Juste travels so fast that a light projection of him is left behind, enveloping with a blue aura around him[25]. Julius himself can move so fast that his own afterimages cannot keep up with him[26]), Far Higher with Sheer Will
Attack Speed: At most Faster Than Light (Can tag Dark Lord Soma, who serves as the absolute evil, the opposite to God[27], where for God to be perfectly good, there must be a being of perfect darkness[28], being the entity opposite to God[29], making him faster then enemies such as the Sky Fish who moves so fast that it appears as a beam of light and is only slowed down when time is stopped[30] and the White Demon, who can move at the speed of light at short distances[31]), Far Higher with Sheer Will
Reaction Speed: At most Faster Than Light, Far Higher with Sheer Will
Stamina: Superhuman (Traveled across the entirety of Soma's newly resurrected Castle, fighting many enemies and bosses reaching Dark Lord Soma and defeating him without showing any signs of tiring)
Range: Standard Melee, Extended Melee with Belnades Staff (Can reach this far with the staff[32])
Intelligence: Supergenius Intelligence (Yoko is considered an exceptional spell caster[33], , where magic requires one to have a deep understanding of Quantum Physics to utilize it to its fullest, requiring understandings of theories such as "Curse Amplification"[34])
Knowledge: Grandmaster level (With the aid of Julius Belmont and 2000s Alucard fought and defeated Dark Lord Soma Cruz[35], who has all of his memories back as Dracula where he was a genius tactician as Mathias, who they called "Cronqvist the Wise"[36])
Powers and Techniques
Resistance to Dracula's Castle's Abilities (Yoko can travel the castle without feeling any of the adverse effects from the castle[56])
The Castle Abilities Include:
Equipment
Belnades Staff
Belnades Staff (also known as the Warakiya Staff) is a mystical staff used by members of the Belnades Clan for centuries. In 2D games, it is a relatively quick overhead weapon that deals a moderate amount of damage. In Castlevania: Dawn of Sorrow, it recovers 1%+1 HP each time it strikes an enemy. It is Yoko's primary weapon passed down to her from the Belnades Clan.
Magic Seals
Magic Seals are a key tool used by Yoko Belnades throughout Dawn of Sorrow. They are required to open sealed doors are essential for permanently defeating most bosses. Magic seals are automatically used on doors, but if Yoko fails to properly draw one during a boss fight, the boss will regain some HP and the fight will continue.
Notable Techniques
Other
Standard Tactics: Yoko will utilize her staff along with her magic spells in combat, along with this she will utilize her magic seals to deal with enemies that regenerate.
Weaknesses: To release the souls under Soma's Power of Dominance requires Soma's cooperation and it is not something easy to do[99].
Note
- Contrary to popular belief, holy attacks and the whips in Castlevania can affect and harm people that aren't apart of the creatures of the night. Leon's doppelganger can use holy water and holy attacks against him in this fight along with the alchemy whip despite Leon being a pure and noble warrior[100]. Simon's doppelganger can harm him with the vampire killer, despite Simon being a noble hero. Holy Water even works and harms enemies such as the "Holy Armor"[101], a knight who has natural holy powers[102]. Corrupted enemies such as Charlie Vincent, use holy water attacks on Carrie and Reinhardt[103]. Characters like Jonathan Morris wear armor like the Holy Mail, an armor that reduces damage from holy attacks[104].
Trivia
- Yoko is likely the granddaughter of Jonathan Morris and Charlotte Aulin, as she is a Belnades, which Charlotte's family is related too[105], she also wears similar clothes to Jonathan in potential official art.
- In Castlevania: Dawn of Sorrow, the Succubus takes the guise of Yoko in order to lure in Soma Cruz and attack.
- Oddly, this also happens in Julius Mode even when playing as Yoko.
- A ninja-type character called "Yoko Felnades" was originally planned to appear in Castlevania: Bloodlines, but was scrapped[106].
Battle Records
14 - 1 - 0
- Bat Company - Fight[115]
- Conditions: None.
- Location: Silenced Ruins
- Dark Lord Soma Cruz - Fight[120]
- Conditions: Julius Belmont, Alucard, & Yoko Belnades all fought together against Dark Lord Soma.
- Location: Abyss
- Note: This fight only occurs if the bad ending is reached in the main Dawn of Sorrow game and is thus not canonical as future sequel events do not cover it.
None.
References
- ↑ Castlevania: Aria of Sorrow
- ↑ Castlevania: Aria of Sorrow Game Manual Page 23
- ↑ Castlevania: Dawn of Sorrow Prologue
- ↑ Castlevania: Dawn of Sorrow Game Manual Pages 22-23
- ↑ Castlevania: Aria of Sorrow Game Manual Page 23
- ↑ Castlevania: Aria of Sorrow Prologue
- ↑ Castlevania: Aria of Sorrow
- ↑ Castlevania Lament of Innocence
- ↑ Castlevania: Aria of Sorrow
- ↑ Akumajou Densetsu Famicon Intro English Patch
- ↑ Castlevania: Curse of Darkness Manga Volume 1 Chapter 1
- ↑ Castlevania: Dawn of Sorrow Dark Lord Soma Boss
- ↑ Castlevania: Aria of Sorrow Ending
- ↑ Castlevania: Dawn of Sorrow Dark Lord Candidates
- ↑ Castlevania: Dawn of Sorrow Ending
- ↑ Castlevania Judgement: True Story Mode, Golem
- ↑ Castlevania Judgment Golem Ultimate Attack
- ↑ Castlevnaia: Symphony of the Night
- ↑ Castlevania: Grimoire of Souls Chapter 8: Demonic Visions
- ↑ Castlevania: Nocturne of Recollection Intro
- ↑ Castlevania: Curse of Darkness Manga Volume 2 Chapter 4 "Redemption"
- ↑ Estimating Weight of Logs and Standing Timber Page 2
- ↑ Castlevania: Curse of Darkness
- ↑ Castlevania: Lament of Innocence Ending
- ↑ Castlevania: Harmony of Dissonance
- ↑ Castlevania: Aria of Sorrow Julius Belmont Boss
- ↑ Castlevania: Aria of Sorrow Ending
- ↑ Castlevania: Dawn of Sorrow Dark Lord Candidates
- ↑ Castlevania: Dawn of Sorrow Ending
- ↑ Castlevania Aria of Sorrows
- ↑ Castlevania Grimoire of Souls Enemy Compendium Showcase
- ↑ Castlevania: Dawn of Sorrow Dark Lord Soma Boss
- ↑ Castlevania: Dawn of Sorrow Yoko's Shop
- ↑ Castlevania: Portrait of Ruin
- ↑ Castlevania: Dawn of Sorrow Dark Lord Soma Boss
- ↑ Lament of Innocence Perfect Guidebook
- ↑ Castlevania: Portrait of Ruin
- ↑ Castlevania: Lament of Innocent
- ↑ Castlevania: Curse of Darkness Manga Volume 1 Chapter 1
- ↑ Castlevania: Legacy of Darkness Camilla Fernandez Boss Fight
- ↑ Konami of Europe's Camilla Fernandez profile
- ↑ Castlevania: Portrait of Ruin
- ↑ Castlevania: Grimoire of Souls Prologue Stage 1
- ↑ Castlevania: Dawn of Sorrow Yoko's Shop
- ↑ Castlevania: Harmony of Despair Yoko
- ↑ Castlevania: Dawn of Sorrow Dark Lord Soma Boss
- ↑ Castlevania: Harmony of Despair Yoko
- ↑ Castlevania: Lament of Innocence Game Manual Page 10
- ↑ Castlevania: Dawn of Sorrow Yoko's Shop
- ↑ Castlevania: Dawn of Sorrow Yoko's Shop
- ↑ Castlevania: Harmony of Despair Yoko
- ↑ Castlevania: Harmony of Despair Yoko
- ↑ Castlevania: Harmony of Despair Yoko
- ↑ Castlevania: Harmony of Despair Yoko
- ↑ Castlevania: Curse of Darkness Absolute Zero Ring Description
- ↑ Castlevania: Aria of Sorrow
- ↑ Castlevania: Harmony of Dissonance
- ↑ Castlevania: Harmony of Dissonance
- ↑ Castlevania: Symphony of the Night Bestiary No. 40
- ↑ Castlevania: Symphony of the Night Bestiary No. 16
- ↑ Castlevania: Portrait of Ruin Bestiary No. 133
- ↑ Castlevania: Lament of Innocence
- ↑ Castlevania (N64)
- ↑ Castlevania: Portrait of Ruin
- ↑ Castlevania: Portrait of Ruin
- ↑ Castlevania: Harmony of Dissonance
- ↑ Castlevania: Circle of the Moon
- ↑ Castlevania: Circle of the Moon
- ↑ Castlevania: Order of Ecclesia Bestiary No. 061
- ↑ Castlevania: Portrait of Ruin Bestiary No. 131
- ↑ Castlevania: Symphony of the Night Bestiary No. 44
- ↑ Akumajo Dracula: Kabuchi no Tsuisoukyoku "From the time they stepped into the mountains, Curtis and Michelle felt malicious intent in the air.
Even though it is still far away, their bodies seemed to squeal [run away].
There was definitely no room for doubt. It is certain that the [castle] exists at the back of the mountains. The church’s greatest vampire hunter, Julius Belmont must be contacted. However, the conversation jumped into the matter of the disappearance of several village children." - ↑ Akumajo Dracula: Kabuchi no Tsuisoukyoku "A drawbridge suspended from the main gate is seemingly welcoming Michelle’s arrival.
And her body was telling her [do not go] as her leg muscles were petrified like stone." - ↑ Castlevania: Grimoire of Souls
- ↑ Castlevania (N64)
- ↑ Castlevania Chronicles
- ↑ Castlevania Chronicles
- ↑ Akumajo Dracula: Kabuchi no Tsuisoukyoku "“Uh……aa……Mi……chelle……”
That really is no doubt an obsession.
The youth had more than 28 holes penetrating his limbs and body. His heart is already starting to fail and he is desperately trying to say something amidst the darkness.
“Only…… protect…… you……-----“
When he said those words he must say, the man’s soul already left his body-----becoming one of the floating spirits that wander the halls of the castle.
However-----
Fate did not allow it.
For those people who are involved with the demon castle, even the loneliness of death seemed half hearted-----
The man’s soul is pierced by a small scythe that flew in from somewhere. That scythe did not exist physically. It was a diabolic blade created by some magic and possessed a strong soul." - ↑ Castlevania: Curse of Darkness Bestiary No. 115
- ↑ Castlevania: Grimoire of Souls Chapter 7 Death's Reign
- ↑ Castlevania: Grimoire of Souls Chapter 1 Dracula's Castle
- ↑ Castlevania: Grimoire of Souls Prologue Stage 4
- ↑ Castlevania: Grimoire of Souls Chapter 2 A City of Fog
- ↑ Castlevania: Grimoire of Soul Chapter 2 A City of Fog
- ↑ Castlevania: Grimoire of Souls Chapter 3 Ash Banquet
- ↑ Castlevania: Grimoire of Souls Chapter 2 A City of Fog
- ↑ Castlevania: Grimoire of Souls Chapter 3 Ash Banquet
- ↑ Castlevania: Grimoire of Souls Chapter 7 Death's Reign
- ↑ Castlevania: Portrait of Ruin
- ↑ Castlevania: Grimoire of Souls Chapter 10 Dracula's Curse
- ↑ Castlevania: Grimoire of Souls Chapter 7 Death's Reign
- ↑ Castlevania: Grimoire of Souls Chapter 6 Accursed Cranium
- ↑ Castlevania: Grimoire of Souls Chapter 7 Death's Reign
- ↑ Castlevania: Grimoire of Souls Chapter 2 A City of Fog
- ↑ Castlevania: Grimoire of Souls Chapter 3 Ash Banquet
- ↑ Castlevania: Dawn of Sorrow Magic Seals Introduction
- ↑ Castlevania: Dawn of Sorrow Game Manual Pages 6-7
- ↑ Castlevania: Dawn of Sorrow Dark Lord Soma Boss
- ↑ Castlevania: Dawn of Sorrow Yoko's Shop
- ↑ Castlevania: Lament of Innocence Dark Palace Of Waterfalls
- ↑ Castlevania: Circle of the Moon
- ↑ Castlevania: Grimoire of Souls Enemy Compendium Holy Knight
- ↑ Castlevania (N64) Charlie Vincent Boss
- ↑ Castlevania: Portrait of Ruin Holy Mail Description
- ↑ Nintendo Power Issue #204 (June 2006), Page 30.
- ↑ The History of Castlevania: Book of the Crescent Moon, page 77.
- ↑ Castlevania: Dawn of Sorrow
- ↑ Castlevania: Dawn of Sorrow
- ↑ Castlevania: Dawn of Sorrow
- ↑ Castlevania: Dawn of Sorrow
- ↑ Castlevania: Dawn of Sorrow
- ↑ Castlevania: Dawn of Sorrow
- ↑ Castlevania: Dawn of Sorrow
- ↑ Castlevania: Dawn of Sorrow
- ↑ Castlevania: Dawn of Sorrow
- ↑ Castlevania: Dawn of Sorrow
- ↑ Castlevania: Dawn of Sorrow
- ↑ Castlevania: Dawn of Sorrow
- ↑ Castlevania: Dawn of Sorrow
- ↑ Castlevania: Dawn of Sorrow
- ↑ Castlevania: Aria of Sorrow


